How to Batch 2 Weeks of Instagram Content in 1 Hour Using Later
Struggling to maintain a consistent, strategic Instagram account? Read on to learn my step-by-step process for batching two weeks of content in one hour.
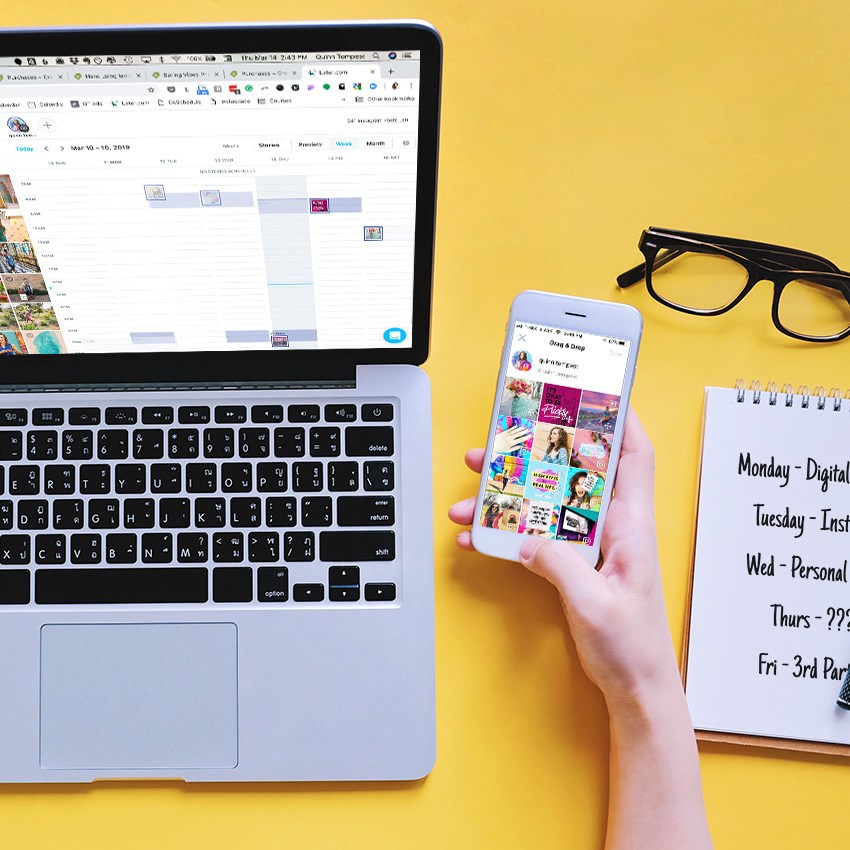
It’s no secret that I love using the Instagram scheduling tool, Later (affiliate link), to plan my Instagram feed.
Its intuitive interface and design make it simple to use, and its superior media organization tools mean I never have to waste time searching for that one image.
In fact, of all the Instagram planning tools I’ve tested (including its main competitor, Planoly), Later is by far my favorite. For over a year now, I’ve been using it to schedule my Instagram posts, and I’ve refined my process to the point where it takes me just give-or-take just 1 hour to batch 2 weeks of content.
Let me show you how I do it….
If you first want quick tour of Later, watch the video below. If you’re quasi-familiar, just jump right to the paragraph below to find out my step-by-step process!
Before you start…
The key to batching your Instagram content efficiently is to already have your photos and graphics uploaded into your Later Media Library. Let me repeat that: you can’t batch content in quickly without having lots of content to pick from!
Although it can be time-consuming to create and source all of that content, investing the time upfront will allow you to spend less time on a regular basis planning your Instagram feed since everything is in one place and ready to go.
One more caveat: having content ready-to-go should mean you also have a content STRATEGY already in place. If you don’t, it’s absolutely essential to start there, but I’ll leave that for another blog post.
Got content + simple strategy in place? You’re ready to rock your planning session, saving time and making better posts as you do!
Two final tips and then we’ll get into my step-by-step process
Organize your Media: To make your batching session even faster, label your photos in the media library so it’s easy to find the right images (see below). For example, I set-up a client’s Later and organized her library by her business pillars. She’s in the wellness world, so her images are organized in “buckets” by labels like “Nourishment,” “Movement,” and “Mindfulness.
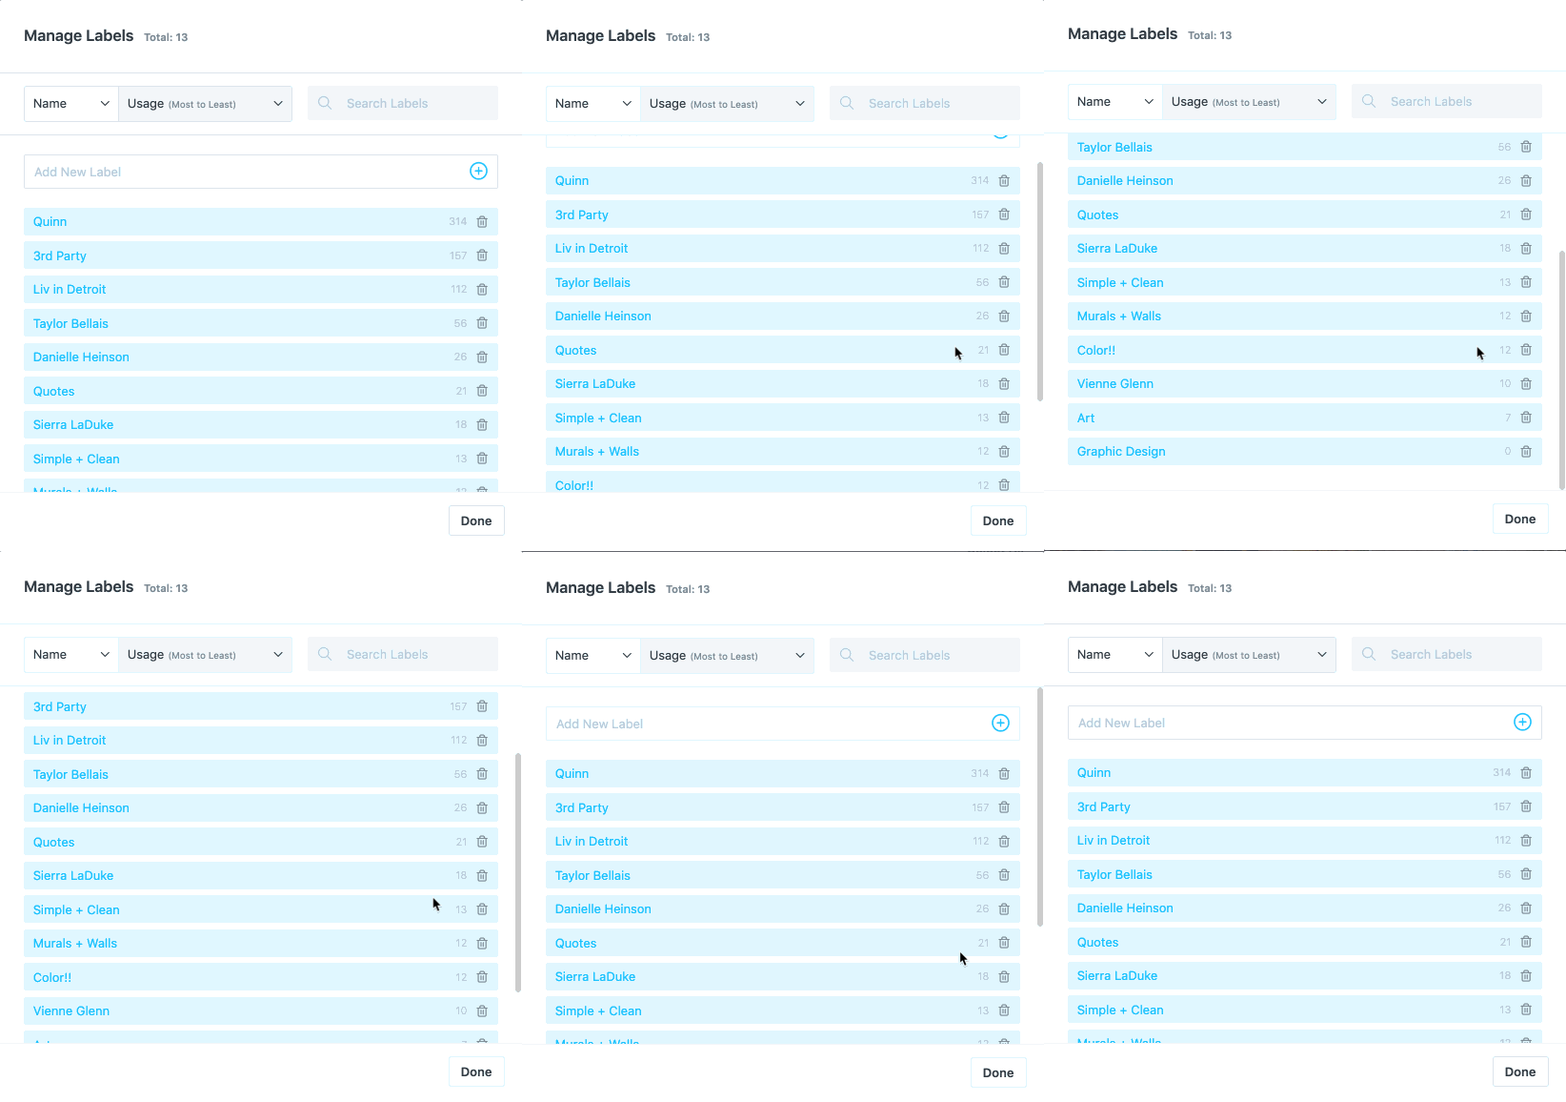
Build a Hashtag Library: Nothing sucks up more time than looking for new hashtags for every post. Again, use the “bucketing” method mentioned above and create hashtag libraries using Later’s Saved Caption feature. This will allow you to insert topically-relevant hashtag groups for each post with just one click.
Now, onto the batching process! I recommend batching your Instagram content for 2 weeks at a time. This way you can think about your feed strategically and holistically with your other efforts, deliver quality content, and stick to a consistent posting schedule.
Want my Instagram marketing checklists? Snag my 9 simple checklists and a list of 21 of my favorite tools to help you create an effective Insta-strategy. Download it for free here.
Step One: Plan out your visual grid using the Preview tool.
The Preview tool is my favorite Later feature. Here’s why …
First impressions MATTER. First-time visitors to your profile likely don’t know much about you or your business, so their first impression of your brand is based on overall look and feel of your “grid.”
Each of those images should work together to create an instant impression that tells customers what your brand is all about. You need photos that look good next to each other in your grid for first-time visitors to your profile AND on their own since most existing followers will see your posts on their feed.
The Preview tool takes away the guesswork of how your grid will lay-out, and shows you exactly the overall aesthetic before you publish anything.
Simply drag and drop content from your Media Library onto your feed and re-arrange as you see fit in alignment with your visual strategy.
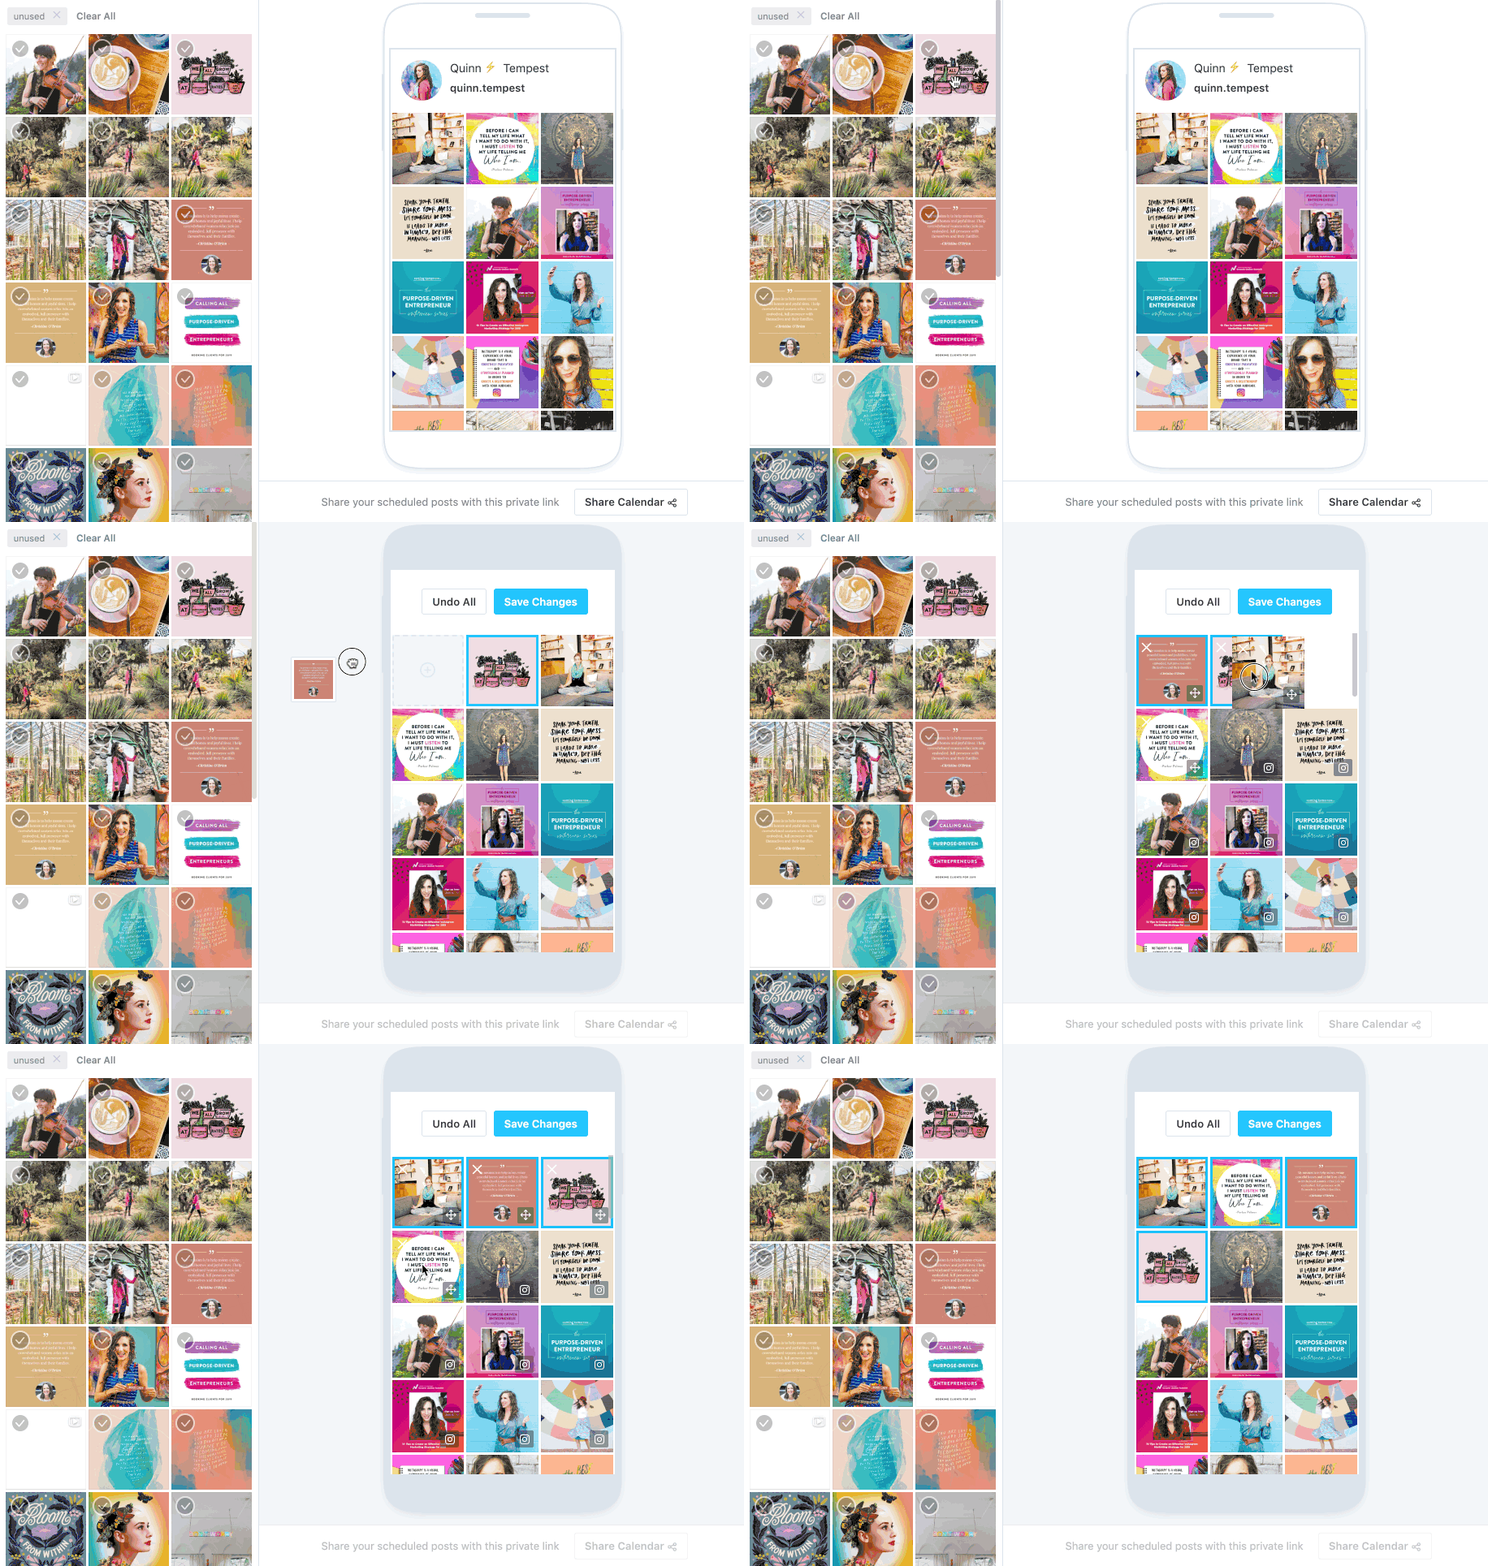
This gives you a carefully planned, visually appealing grid that instantly tells your audience what you’re all about. More than ever before with the rise in prominence for Stories, your profile should look and act like a curated ‘landing page’ for your brand. Your Stories are a chance to give your followers a more in-the-moment, authentic look behind-the-scenes of your brand.
Strategy tip: Although this step has a lot to do with the look of your profile, you should be thinking strategically as you go along. Some questions to ponder: What business goals you currently have and how can your content support them? Have any announcement or news coming up in the next two weeks you need to plan for? Do you have a healthy mix of your topic “buckets” to support your goals? Pretty pictures only go so far on the Gram, so ensure you have a strategic backbone to your grid, always.
Step Two: Move your posts to the times you want them to go live.
Once you have your grid arranged perfectly, switch over to the Week view and drag your content to times and days you want posts to go live. You can also create standard scheduling blocks by double-clicking the day and time you’d like your content to post (i.e. Wednesdays at noon). When you drag a photo into the Preview in Step One, it will automatically land on that time preset you just created.
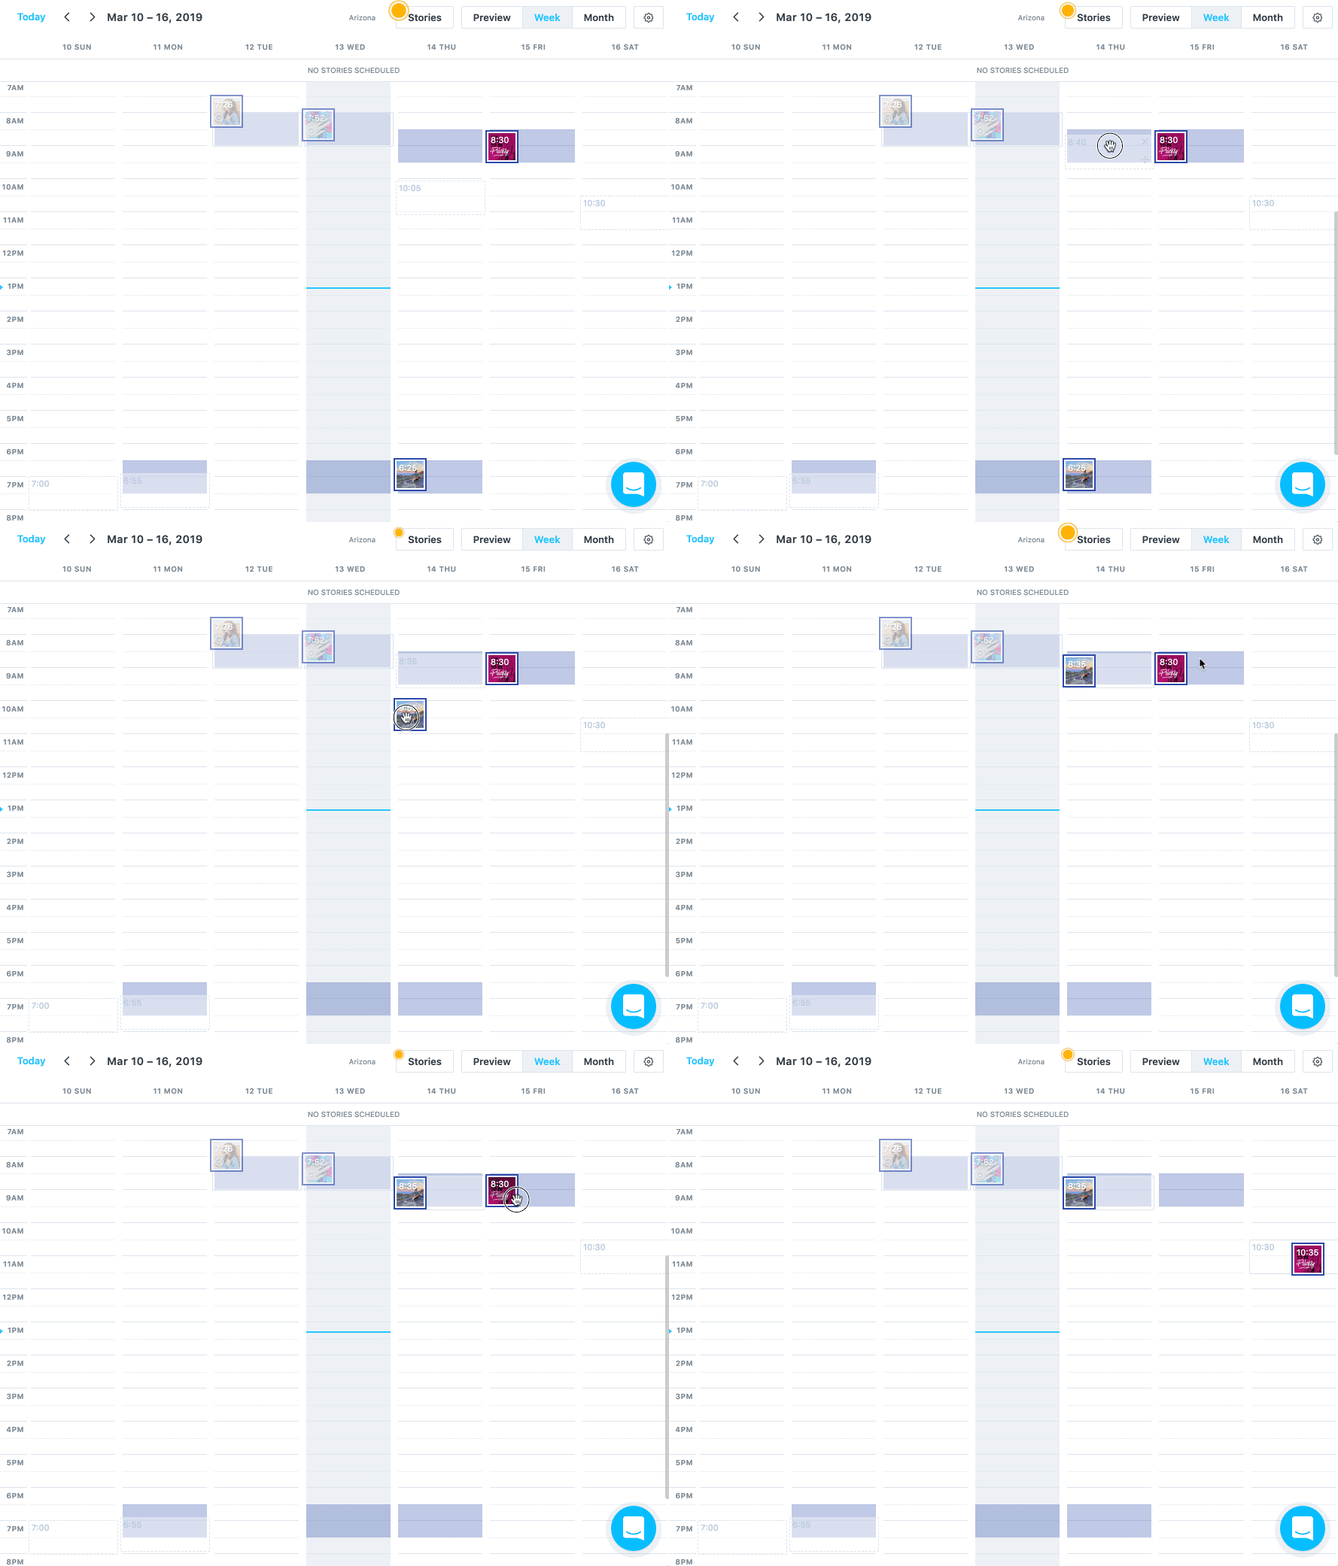
If you’re using one of Later’s paid plans, you’ll see colored boxes highlighting your best times to post based on your past posts’ engagement rates, making it even easier to schedule. Just remember that you’ll need 50 posts to go live before Later has enough data to determine your best times.
You can also test a few different times over your first month or two using Later to see for yourself which times get the most traction. Schedule your posts for the time that you think works for you, and be consistent about when you post.
Strategy tip: I really can’t emphasize enough the importance of finding your best time to post on Instagram. The currency of Instagram is engagement, so the more engagement your posts get quickly after it goes live, the more reach it will end up having. That being said, you want to schedule your posts for when your audience is more likely to be online, which is different for every brand. Start simply by seeing where most of your audience lives (found in the native Instagram insights) and test out morning, midday, and evenings for a month to see what works best.
Want more engagement?
Sign up for my free video training to learn how to reverse-engineer the algorithm and drive real business results ($$$) from Instagram... no matter your follower count!
Step Three: Write all your captions at once.
Now that your posts are scheduled, it’s time to dig into the captions.
Writing all of your captions in one fell swoop allows you to craft a consistent narrative between posts so that they are complementary — just like planning your feed in the Preview tool helps you to have a feed that works together visually. This will also enable you to “get in the zone” with getting them done, since it’s often a hurdle for many businesses marketing themselves on the Gram.
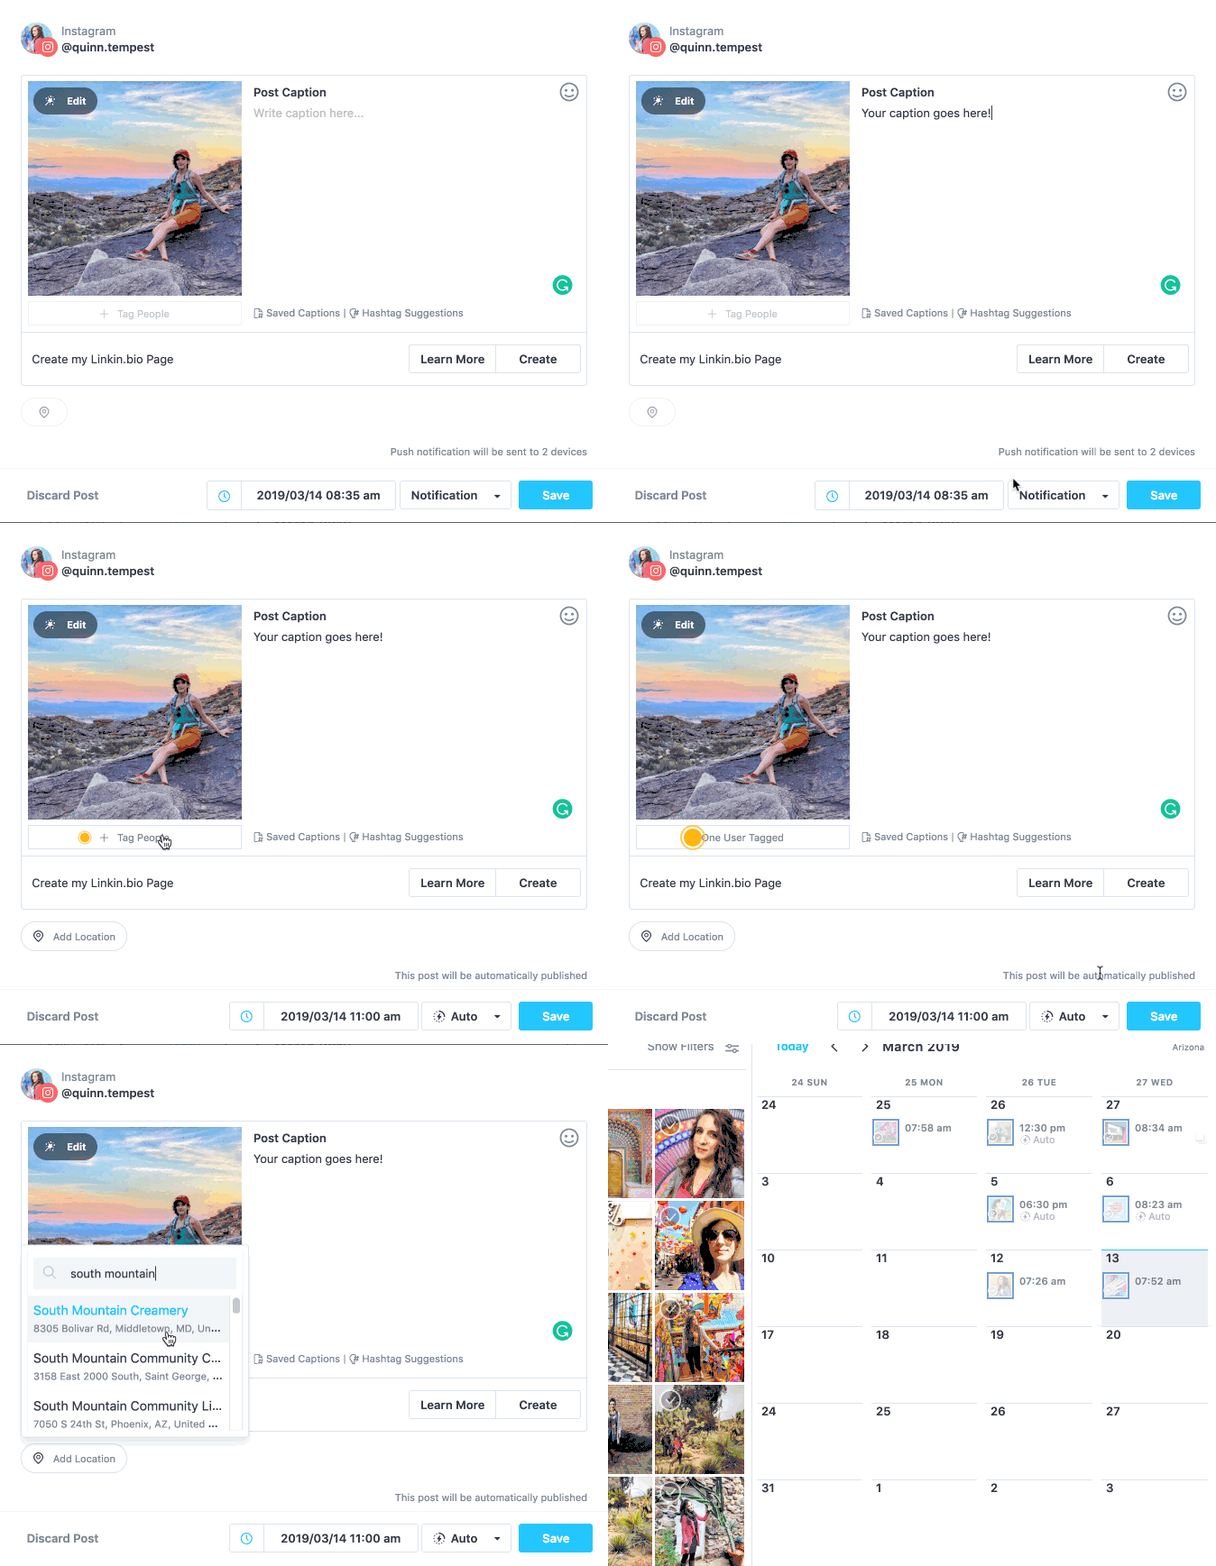
You can write your captions by clicking into a post from either the Week view or the Month view. While you’re in the post, you can also crop or edit your photo if you haven’t already done so, as well as add a location and tag other accounts. Lastly, you can set the post to auto-publish or to send a notification to your phone so you can manually publish it.
Strategy tip: There’s a wide gamut of caption styles, and there is no right or way to write them. The answer to how to create captions for your brand should be informed by your content strategy and your general content ethos. For example, my personal main ethos is to educate and inspire, so my captions are often filled with quick tips and tricks that are extremely useful, or longer personal narratives that would inspire my followers. The answer to “what should I write” is rooted in your brand purpose and what will best serve your audience. Start there to find clarity.
Step Four: Choose your hashtags from the saved library.
Instagram lets you add up to 30 hashtags per post, which is great news for getting your content in front of new people, but not so great if you’re trying to remember 30 (or more!) different hashtags every time you write a caption.
Fortunately, Later has a Saved Captions feature that lets you store text segments for future posts. I use this to save the hashtags I use most often and divide them up by categories that align with my content strategy.
For example, my saved categories include:
- Purpose
- Women Entrepreneurs
- Murals
- Color!
- Creativity
- Etc.
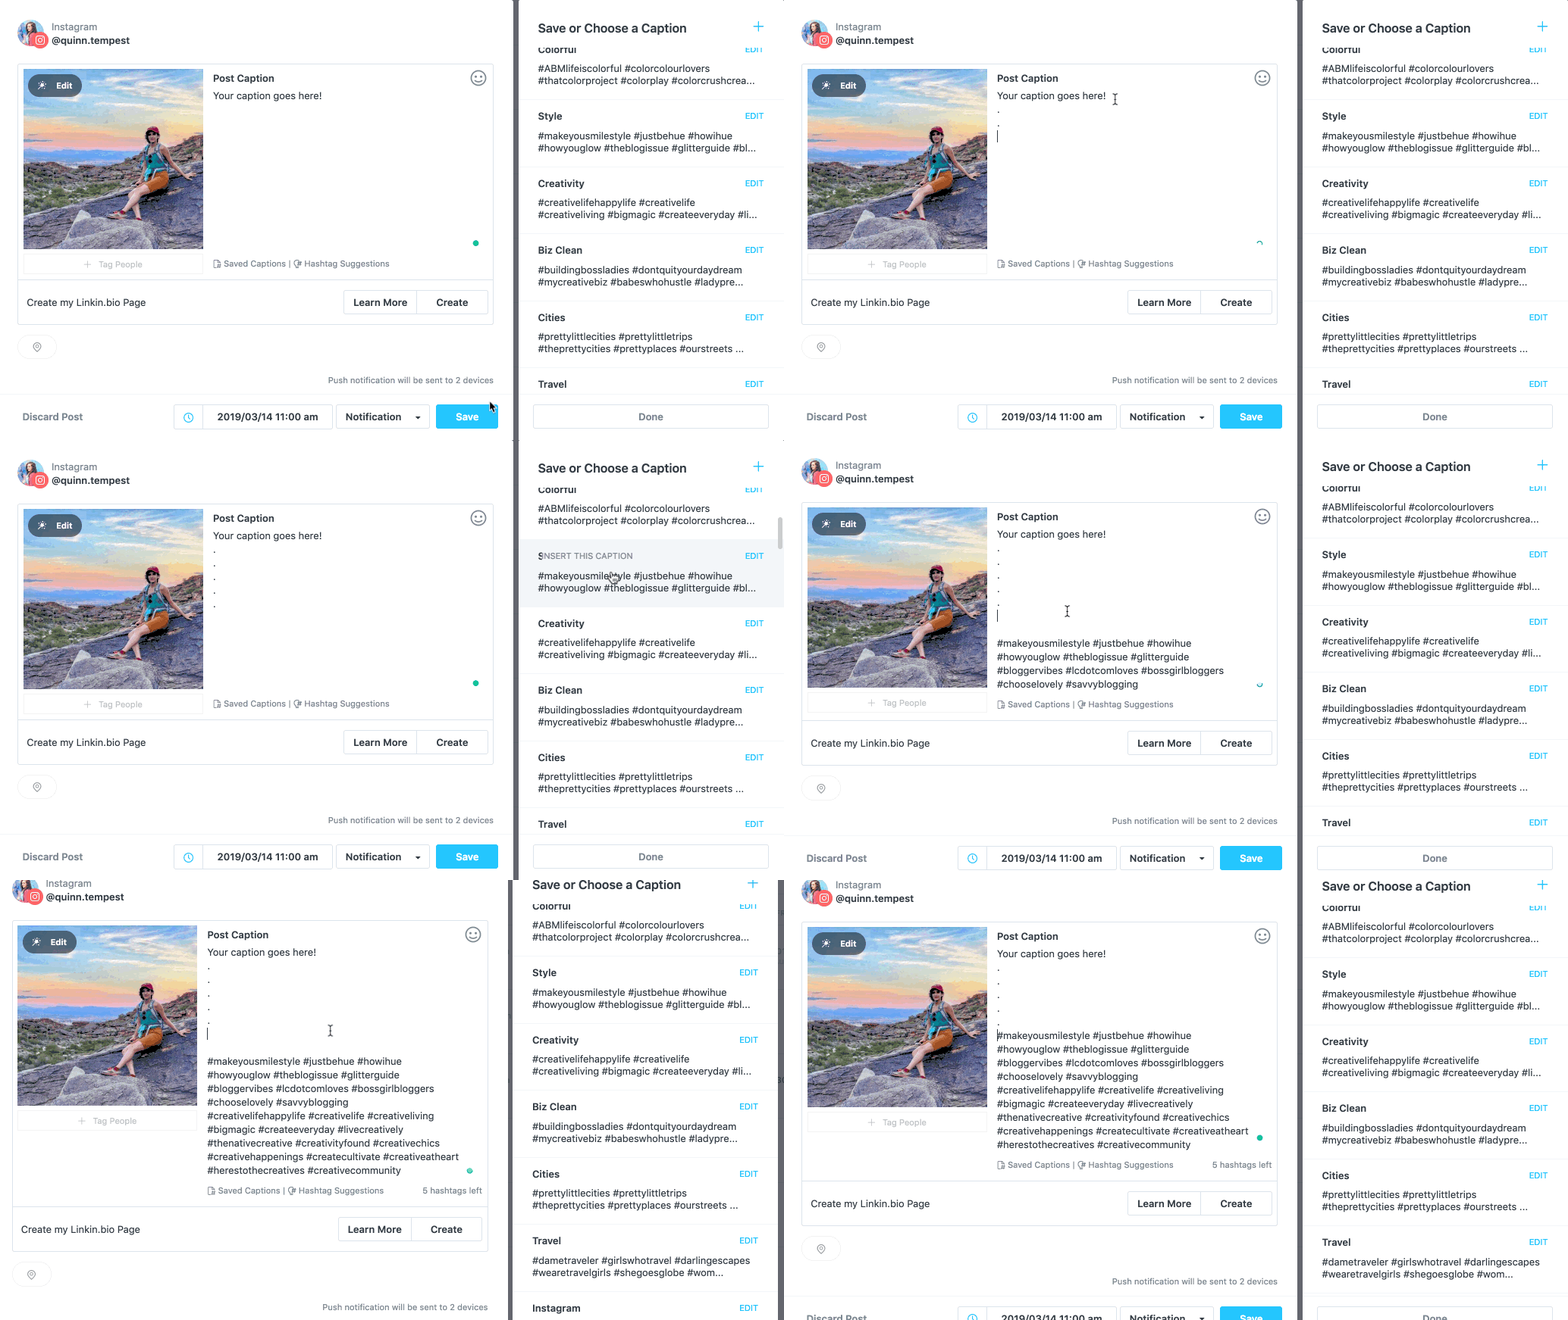
Start by hitting the Enter key after your caption and typing a period, then repeat four times so that you have 5 lines of a single dot beneath your caption. This keeps your hashtags from being included in the caption preview that people see as they scroll through their feeds, and creates visual space for the caption to stand out once someone clicks to read more.
Then, simply click the saved category that you want to add. Later automatically pops those hashtags into your caption for you and keeps a running count of how many hashtags you can still add.
If you’re using a paid version, you can also try Later’s Hashtag Suggestion feature — tell it one of the hashtags you want to use, and they’ll automatically generate the best related tags for you to add. Otherwise, you’ll need to come up with these hashtags yourself.
Strategy tip: This is a 101 Instagram tip, but I get asked all the time: how do you add line breaks? You can do this by adding periods between each line in the Later caption field, or use this simple handy-dandy tool to do it without the extra characters. Feel free to use all 30 hashtags you’re allowed and put them right in the caption itself to make your auto-publish that much more seamless.
Step Five: Engage when the posts go live!
Congrats, you did it!
You made it through your first batching session with strategic, consistent content. You can relax knowing that your next two weeks of content is taken care of.
If it took you only an hour on the first try, wow! You’re a superhero.
If not, don’t worry – you’ll get the hang of it after a few times.
But wait – you still have work to do…
Just because you scheduled your Instagram posts in advance doesn’t mean you should “set it and forget it.” Since you know when your posts are going live, put it on your calendar to engage for 30 minutes once your posts are published. This will boost your engagement, nurture your relationships, and help your posts get maximum reach!
If you can’t engage consistently when your posts go live, maybe dial back your posting schedule so you can focus on quality over quantity.
Step Six: Know that this is just the beginning…
Sometimes this batching process takes me less a solid hour, sometimes much longer. If I have to create new content myself or source 3rd-party content, my planning sessions can be much more intense and I tend to spread them out over a couple of days.
But when I have content ready, I have my strategy in place, this process absolutely HUMS and is – dare I say – FUN!
The exact timing is less important than the PROCESS, and the process is about building a HABIT.
When you create a habit of staying consistent with your social media, you are more able to communicate your brand purpose to the world and attract the kind of customers and clients you’ve always wanted.
I have watched far too many biz owners and entrepreneurs – at every scale and industry – get in their own way with their marketing because they haven’t taken time to build a habit that is fundamental to their business success.
So YES this post is about Instagram and YES it’s about using this one tool to become more efficient, but it’s also about way more than that.
It’s about how you can optimize your time and attention in order to get out of your own way and bring your powerful, magical ideas to life.
This is just the start….now go get ‘em tiger!




These are great tips Quinn! Thank you. Saving captions tip is especially helpful. Love Later too!
Glad you like them Brenda! It’s an uphill battle to form a habit like this but SO worth it. Tools like Later surely help!